somewhat visibly mended shirt

The project

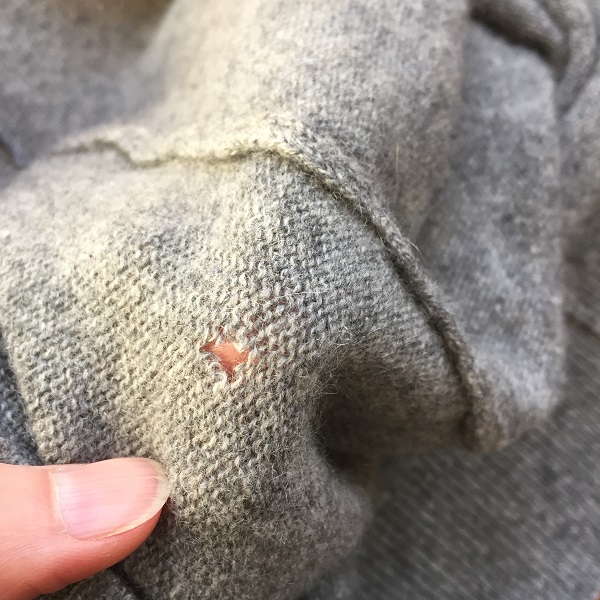
Mend small tears in a shirt caused by wear and strain.

Why I chose to mend it when I did

Not long ago, I noticed that this summery linen-cotton shirt of G’s had become damaged and I put it in the mending pile but I wasn’t quite sure what fabric I’d use for the patch. A little while later I was reorganising my sewing stuff and fabric scraps and came across an off-cut from when I shortened this shirt along with the three others G has in the same style. In essence, that eliminated a decision, making the project feel easier.

Then the other day, I was washing those other three shirts and, noting this one’s absence, asked him if he knew where it was. It took a while for me to clue in.

Anyway, it’s perfect weather for this shirt so I figured I should get it back into circulation before the weather turns cool again.

The process

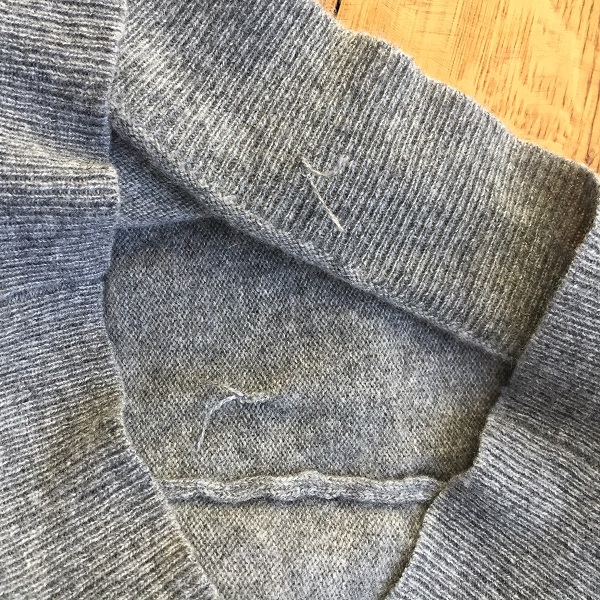
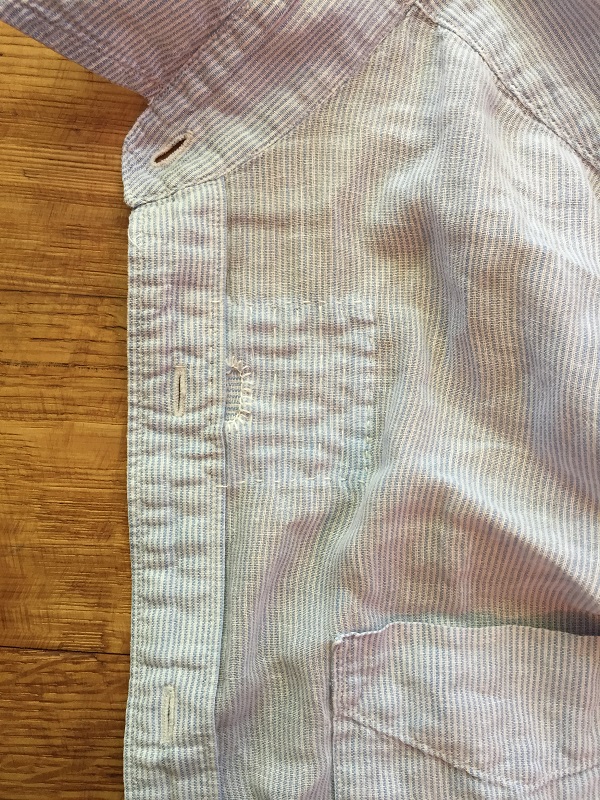
I already had fabric that matched perfectly. Next was to choose the thread. I looked at my collection of heavier threads and embroidery floss and found a white linen as well as a pale blue linen (both actually intended for weaving rather than sewing) that was pretty much a perfect match. (My pointless superpower is always having matching thread.) I preferred the white. It’s “somewhat visibly mended” because I wasn’t trying to make it invisible, but I also didn’t want to make it into a big feature because G prefers low contrast looks.

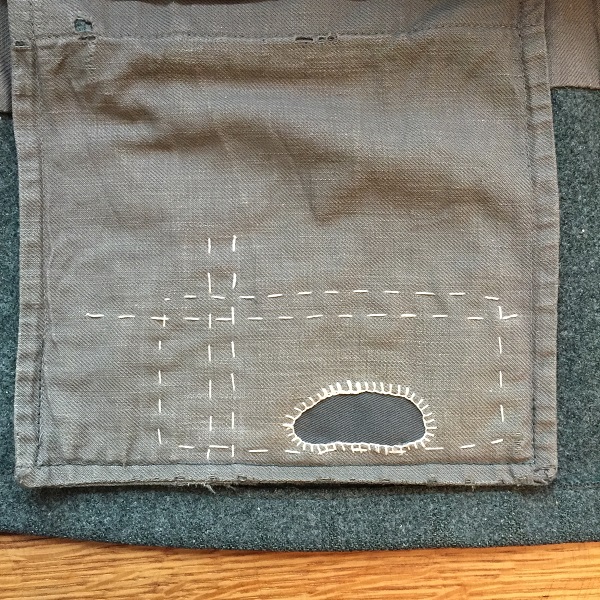
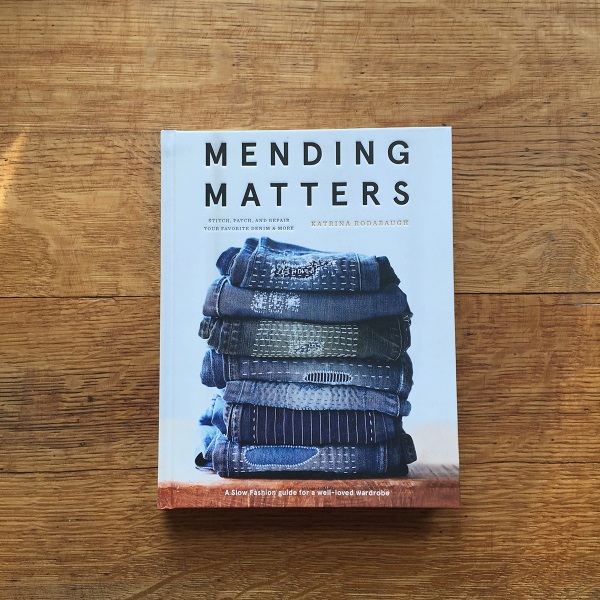
I rotated the patch so the stripes were perpendicular to the body of the shirt, partly for visual interest and partly because it would look weird to me if the stripes didn’t match up and there’s no way they’d match up. I tacked down the remainder of the patch using running stitches to strengthen the whole area, which was rather worn. (Technique inspired by Mending Matters,  discussed here.)

Then, as I was about to toss the shirt into the wash, I noticed the other tear, which I’d known about but forgotten. Damn.

If you want proof as to why it’s a bad idea to stitch down pleats, look no further. The back pleat is supposed to give extra room for movement through the shoulders. Stitch down the pleat, lose that room. Duh. When I originally noticed the tear in this shirt, I immediately ripped out the stitching in the other three. I don’t need to do any more patching than absolutely necessary!

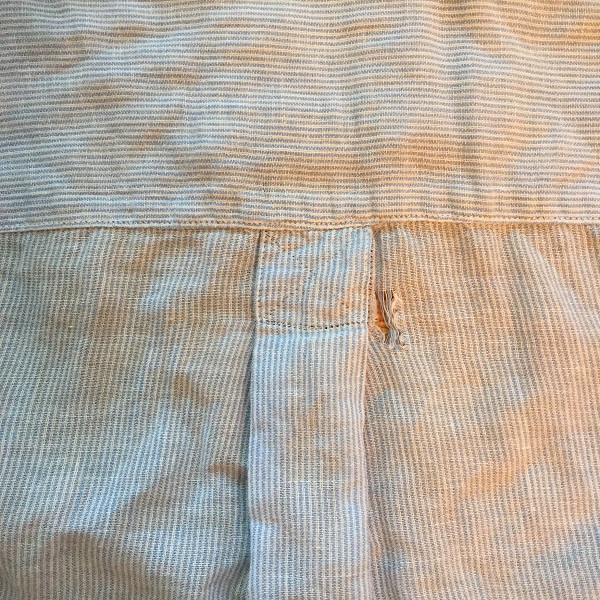
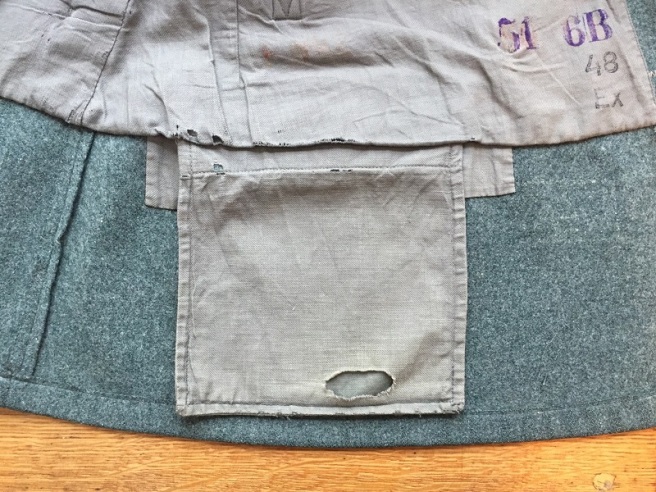
The back patch was very similar to the front patch except for the placement: the front patch location was informed by the presence of the placket, while the back patch needed to relate to the (now-released) pleat. The back patch is virtually centred on the hole. It didn’t seem necessary to tack down this patch, not least because the source of the strain had been removed.

I glued this patch in place with a glue stick rather than pinning.

As it happens, I discovered this article yesterday via FB: The life changing magic of making do. “[G]etting mileage from our things should at least engender a sense of pride, and of mastery,” and for me it definitely does. Odd as it seems, it takes effort and skill to completely use something up, and I enjoy that sense of accomplishment.

mending tiny holes in a cashmere sweater

On this project, I’m back to mending with the goal of making the mend invisible.

The project

Mend a tiny hole in the waistband of my ash grey cashmere sweater. I don’t know what caused the hole — it was so little and clean, I thought maybe it had gotten cut by a blade before I bought it. I ended up revising this theory later.

Most of my mending serves to repair ordinary wear and tear, but this time I’m dealing with specific damage. Ultimately the goal is the same — to extend the life of the garment.

Tiny hole in the waistband

Why I chose to mend it when I did

This sweater sat in the mending pile for months upon months because I had very little experience mending knits and this one is cashmere and not cheap and I didn’t want to fuck it up. And I didn’t have any thread/yarn that I thought would work. Also, I’d been feeling more indecisive than usual due to some mental health stuff, and so much of sewing and mending is just making a series of decisions.

But then I was feeling more with it, so I took a look through the mending pile and found that this project now felt like one of the easier ones. A while ago, I fixed up a friend’s heavy wool-and-possum (it’s a New Zealand thing) cardigan that had been somewhat mangled by moths. The mends, though inexpert in some ways, were very much good enough. The hole in my sweater was much smaller than those, and also smaller than I remembered it being.

The process

The technique I found when researching for my friend’s cardi is to stitch a circle around the hole using ordinary sewing thread, draw it closed, and then stitch across to secure. I had asked in a woollens shop for some thread for such a repair and the woman there said she used ordinary sewing thread too, so I tried it. It got the job done but I wasn’t entirely satisfied with the results with that thread.

But then during a trip to Paris, I found some fine woolly 4-ply thread that looked promising. (It says Repriser, Broder, Festonner, which I now know means “darning/mending, embroidering, embellishing” — well, literally “festooning”, but I don’t know anyone who talks about festooning as a type of needlework.) I picked up a few colours that I thought would be useful, including a charcoal, but not an ash grey that would have matched this project because I’d entirely forgotten about it. But charcoal is close enough, especially on a hole this small.

So I had thread I could use, but just before I cut, I remembered that I’d gotten a short length of repair thread/yarn with the sweater when I bought it. (Does anyone ever use that thread? This was certainly my first time.) So, hurrah!

The technique I’d found seemed like it wouldn’t work well on a hole as tiny and linear as this one, so I ended up taking 4 stitches across, with the slight fluffiness of the thread helping to fill the gap. (Thus roughly 3 months of procrastination per stitch.)

Mended hole in the waistband

I returned the sweater to circulation and when I went to wear it proudly a few days later, I discovered another hole! Dammit! This one was a little bigger (though still pretty small) and looked more clearly like insect damage. I guess. I didn’t think we had insects here that would eat wool, so it’s not something I’m all that familiar with.

A less-tiny hole by the side seam

I assume now that the first hole is attributable to the same culprit. (I’m also choosing to believe that this hole happened about the same time as the first one, and not while sitting undisturbed for months waiting for the original hole to get fixed.)

I stitched across the hole with a ladder stitch from one end to the other and back again.

Mended hole by the side seam

I wonder if circling around the hole would have been more effective on this one. The mend is less apparent now that it has flattened and stretched a bit with wear. It’s just to the front of the side seam, at the lower ribs, and thus often hidden by my arm. No one will ever notice.

So, as I suspected, woolly thread when mending woolly knits is definitely the way to go, if you can find the stuff.

visibly mended coat pocket

This is my first project directly inspired by the techniques in Mending Matters.

The project

Mend the pocket of my coat, which had developed a big hole from carrying keys. The fabric of the pocket (as well as the lining) is cotton so it wears more quickly than a synthetic would. Both coat pockets have holes, so I chose to repair the easier one first. The coat is only partially lined and thus the pocket bags are very accessible.

Why I chose to mend it when I did

I’ve had holes in both pockets for years now and just worked around it. I could often get away with not taking my keys at all because my partner and I were both working from home. If we went out together, he’d take his keys and I’d leave mine behind.

He has since gotten a job that’s not only out of the house but out of the city, and suddenly I had to carry keys again. I was tired of the workarounds that I’d used when he’d been away studying before, which was usually throwing the keys into my fabric tote bag (I don’t carry a purse). But then the keys are at the bottom of the bag and possibly bruising the fruit and vegetables I’d just bought.

The process

This mend is visible in the sense that I chose non-blending fabric and thread for the repair, but only if I show it off because this area is of course ordinarily hidden inside the coat.

For my patch, I used a scrap of robust cotton twill that was originally from a project I’d made many years ago for my partner. I chose it for practical reasons, but I found that connecting this project for me to that older one for him was also rather satisfying.

I’d cut the left edge previously by following threads. The new chalk marks are square and show just how off-grain the fabric is. That’s not too surprising though, as twill often skews like this. I left the selvage on because it avoids a raw edge (helpful with an area that gets a lot of wear) and the different weight and tension of that bit of fabric wouldn’t cause any problems.

Usually when I apply a patch, I’ll glue it in place using an ordinary glue stick so that it doesn’t shift while I’m stitching. But that’s usually for jeans or other clothes that are getting washed and I’m not sure whether the glue would cause problems if it stays in indefinitely. This time I skipped the glue and tried the safety-pinning method shown in the book.

The safety pins worked just fine, but I still prefer gluing. I made sure to put the right side of the fabric facing out.

As luck would have it, I was in Japan in November and when I was at a large department store with a great craft and sewing section I remembered that I was considering trying out sashiko embroidery. At the time I was envisioning the classic white-on-indigo look, so rather than availing myself of the good range of colours they had (where do you start? where do you stop?), I just bought one skein of white to try it out.

I considered using that white cotton sashiko thread here but found that it looked a little harsh with the fabrics of the coat and patch — the lining fabric is a slightly warm grey. So I chose a cream-coloured cotton embroidery floss instead, which I found to be much more complementary, and the tint is so subtle that it still reads as white. Yes, the floss has a bit of sheen that the sashiko thread doesn’t but it’s not noticeable unless you’re looking for it.

All of the stitching was done with three strands of floss. The rectangle is the first part to be completed as its function is to secure the patch. I did the bacteria-like mend next, and rather than whip-stitching according to the book, I did a blanket stitch. The finished look is almost the same, but the blanket stitch effectively outlines the hole in thread which gives it a little more protection from wear. Because I’ve done more blanket stitching than whip-stitching, I also find it easier to do evenly. Finally, I threw in a few gratuitous lines of stitching because (a) I like how it looks, and (b) it gives a little more stability to the “white space” of the patch.

I’ve had this coat (and its twin — that’s another story) for many years already and had been idly thinking of a succession plan since it is (they are) showing a fair amount of wear. But wear is love, and now I’m inclined to keep it (them) on the road as long as I can.

visibly mended gloves

I first heard of visible mending years ago, online somewhere, but almost certainly in reference to Tom of Holland, who is its biggest proponent. Tom is mentioned in Mending Matters, but I fixed up these gloves before I bought the book and with just my dim memory to inspire me.

The project

Mend a pair of good woollen gloves that my partner had received as a gift from his mother. She’d bought them on a trip to Australia, if memory serves, and so an exact replacement wasn’t possible.

Why I chose to mend them when I did

It was winter and he didn’t have any proper gloves. He had also just gotten a job in a nearby city and I wanted to send him off a little more prepared, since I now wouldn’t be able to present the mended gloves to him just whenever I felt like it. (Which, if past experience is anything to go by, is possibly never.)

The process

This mend was visible of necessity. I have only two types of wool thread in weights that I thought might work: this blue, and a red. The red was too much. I like the blue with this grey, and despite the fairly high contrast he was OK with it too.

I bought these wool threads at a weaving shop in London, so it’s not like I can just pop round to pick up a better match. Of necessity I got creative with what I already had, which is kind of what mending is about anyway. While working on this project, I was reminded of the Christmas when these gloves were given, and the field trip with friends to the weaving shop out in a part of London I’d never been to before and haven’t returned to since.

I didn’t try to make the mended patches into any particular pattern. I just reinforced what was worn. The gloves are seamless (sorcery!) and I couldn’t quite figure out how the joints on the thumbs were achieved, but there wasn’t much wear there anyway so I just skipped those bits.

The blue thread was too thin on its own, but doubling it gave it just the right weight. I folded it and threaded the resulting loop through the needle so it was easier to unpick if necessary. (And it was necessary.)

I’ve learned that the technique I used is called Swiss darning or duplicate stitching. You follow existing stitches with a sewing/darning needle.

I didn’t keep track of how long this took me, but it was a long time and a labour of love. Six hours sticks in my mind but that might be for one rather than both. *shrug*

The stitches are small enough that my eyes were starting to cross, but I also did enough of it that I got into a state of flow, which kept me stitching longer than I would have predicted I’d have the patience for. I’m not a knitter, but I got a taste of the meditative nature of knitting, in addition to the satisfaction of providing for a loved one and keeping textiles out of landfill.

Visibly mending a mass-produced item is a way of asserting one’s personality over potentially dehumanizing mechanization, like an abandoned car becoming overgrown with weeds. It’s a small and cozy act of rebellion.

mending matters

I haven’t blogged here in over 5 years.

I wasn’t enjoying sewing and at the time I didn’t understand why at first. I wasn’t sure if I even liked it. Sure, I mended stuff from time to time but never thought much about it, other than feeling that it was something I kinda wanted to do but also that it was some kind of obligation. I didn’t mind mending, and I preferred it over new projects, but it wasn’t something I got very excited about either.

Over the years I’ve figured out some of my issues with sewing (a discussion for another time), but it’s this book (a recent find) that prompted me to kick-start the blog again: Mending Matters by Katrina Rodabaugh.

Mending Matters by Katrina Rodabaugh (New York: Abrams, 2018)

It offers some basic techniques and ideas for mending and reusing textiles in the context of a strong visual aesthetic that happens to be Very Much My Style. And the whole book is so up my street, I’d offer to feed its cat if it went away on holiday.

This book validates my instinct to mend rather than toss damaged textiles, whether it’s jeans, knitted gloves, canvas tote bags, socks, underwear, or my much loved (and thus somewhat threadbare) winter coat.

Can I afford to buy new things to replace the ones that show some wear? Sure; this isn’t about personal necessity. But I have a very keen desire to keep stuff out of landfill if at all possible (and if not, then as long as possible), and that goes to a bigger picture need to minimize my impact on the planet.

In fact, it’s so very easy to just buy a new whatever, that it takes time, effort and determination to actually wear something out. It feels like an accomplishment, and it’s one that I’m proud of. Some of my partner’s T-shirts recently got beyond mending so I rendered them down into new dishcloths. (I like cloths that are 12″/30 cm to 14″/35 cm square, just by the way.)

And mending, like sewing, is a way of providing for yourself. It builds skills and, in the process, a sense of self-efficacy that simply cannot be bought. All of this contributes to self-esteem, which is no bad thing.

When it comes to clothes, buying a new whatever is actually not the easiest for me since it’s difficult to find things that fit. If a piece of clothing is damaged, I take it out of rotation so the damage doesn’t get worse. Mending is thus a strategy for adding an item (back) into my wardrobe, and as such, it’s much more efficient for me than shopping.

I’ve mended lots of items over the years, but one of the ideas in Mending Matters that was new to me was to take the opportunity to make the mend attractive in its own right as a design element. Some mends are better if they’re invisible, but visible mends can fuse craft, art and utility.

So I’m going to keep mending but I’m going to try to bring more creativity and enjoyment to the process, as well as acknowledging that mending is valid and good and worth talking about.

silver project 1: sleek maxi skirt

IMGP0910 IMGP0915So this worked surprisingly well.

Back in June, I made my first project using the silver knit (probably considered a sweater knit) and plain grey knit described here. I bought the silver because I had been thinking about some sparkle for stage and thought this would complement my soft summer colouring. I don’t know that the fabric is a direct hit on soft summer – I’m not sure that it’s sufficiently muted. But then “muted” isn’t necessarily the first choice for stage either ::shrug::

I used rectangular construction: 4 equal gores/panels; seams on the princess lines (rather than at centres and sides). For width measurements: I measured below my waist (where I wanted the waistline to sit) as well as around my stride at the ankles, divided each measurement by 4 (zero ease), added 1/2″ SA to each seam. For the length: I measured waistline to floor plus 4″ for casing, hem allowance and just in case. This results in a trapezoid shape. For efficiency of cutting and minimising waste, I drew 4 nesting trapezoids directly on the fabric. The fabric has a faint horizontal stripe effect but I wanted the stripe to be vertical because I need all the help I can get in the height department, so I cut my fabric on the cross-grain, knowing that I was breaking the rules and that the outside of the skirt would probably grow in length.

Once I had the skirt and lining assembled, I put on the skirt to figure out where I wanted the waistline. I did my new standard adjustment: waist is 1″ lower in the front. I drew the seam line, sewed it, trimmed it, turned the skirt and lining right way out, and ran another line of stitching around the waist to form the bottom of the casing.

Once I had it wearable, I put it on from time to time and just to wear it or to practice my dance piece. This helpfully let out some of the inevitable stretch in length that resulted from cutting it out on the cross-grain. (It also ended up affecting the choreography because some moves looked more interesting in this “frame”.) The idea was to see if I needed to adjust the shaping at all. I’d thought that I would need to shape the seams at the top, but the stretch + zero ease + angles actually worked out just fine. The skirt is a long, narrow A-line, but it stretches around my bottom a little and looks like a slight mermaid cut.

I trimmed the bottom of the skirt and lining to give them a proper curve. I wanted the outside to be a little longer so the lining wouldn’t show. Because the outside and lining were cut exactly the same but the outside stretched in length a little, I was able to trim the same amount off of the bottom of both layers and still have the lining hidden. Slick!

It turned out better looking -and with a lot less effort – than I expected: win! I was also pleasantly surprised to find that the fabric (especially the lining) is more comfortable than I anticipated, though the fact that it’s synthetic makes it a little more sweat-inducing than I like, but it’s a small price to pay. It’s super comfy and allows a surprising range of motion considering how narrow it looks. When I was making it, I thought I’d wear it for 2-3 performances a year. Now I like it so much that I’ll be looking for excuses to wear it as “real clothes”. Quick, someone invite me to a wedding!

Ordinarily, I agonize when making clothes, and yet this project went smoothly and never got stalled. What gives?

  • Knits are so much more forgiving than wovens. It would take a major screw-up before this project was going to feel uncomfortable.
  • It was meant as a costume. It just has to look good in short bursts.
  • Skirts are easier than pants. The only section of this skirt that affects comfort is the top – from waistline to hip (widest part). Below that, comfort isn’t an issue – it’s just drape.
  • Oddly, I have a lot more experience making costumes out of geometric shapes than making real clothes using commercial patterns. My plan was to put this together on the basic lines and then fit the skirt more carefully by taking in the existing seams (the way I made my Viking apron dress). But when I tried it on, it was good enough as is and I didn’t see the need for any tweaks.
  • I started with 4m of fabric, 150 cm wide, for which I paid the princely sum of $10. It’s unknown fibre, and I expect it’s 100% synthetic. I like it enough but I don’t love it. It’s not perfect. It looks like speaker fabric mixed with steel wool. It’s the opposite of precious. When I bought it, I had one project in mind that would take about 1.5m and I had no idea what I was going to do with the rest. This turned off the perfectionism and I allowed myself to just use it.

What I learned about myself:

  • My HSP conscientiousness manifests itself with a preference for natural fibres and worry about proper disposal of waste, or, even better, avoiding it altogether. When it comes to sewing, this tends to paralyse me: it’s impossible to sew and be 100% waste-free, especially when trying something new. Rectangular construction, however, is a very low-waste approach, which allows me to relax.
  • Since I have more experience with rectangular construction than commercial patterns, patterns may also overwhelm me because there’s too much that’s new -I’m starting from scratch.
  • My HSP heightened body awareness and need for comfort coupled with my current skill level re fitting make knits an excellent choice – no matter how much I enjoy feeding crisp linen through the machine.
  • My HSP awareness of subtlety gives me a good eye for proportion and details. It may be that I get overwhelmed with the info that wovens provide in a garment (e.g. I see all these drag lines but what do I do about them all?). An eighth of an inch doesn’t matter in knits so I get to use my eye in an artistic way, rather than a scientific way. Refreshing!

know thyself

Why didn't I think of this before? A collection of swatches on a corkboard means I don't have to retrieve fabric from the basement to remind myself what it looks like (and then have to put it away again).
Why didn’t I think of this before? A collection of swatches on a corkboard means I don’t have to retrieve fabric from the basement to remind myself what it looks like (and then have to put it away again).

Going through some Shitty Stuff last fall and winter, decluttering, and getting some sewing done over the summer. The connection? I learned some things about myself and began to apply them.

The Shitty Stuff led me to be more introspective, or rather, “more introspective than usual”. (Given how introspective I already am, being more introspective is something of an accomplishment.) I realised that, although I already knew myself pretty well, there was still a lot to figure out.

First, the physical. I already knew that my colouring is soft summer (cool and muted/dusty). As for build, I’m short and slim. My horizontal measurements make me look a little broader than I like, even though my side view is narrow (I’m elliptical, using the terminology on Inside Out Style), and I’m short-waisted. Thus, waist seams bad, princess seams good. But then I got stuck trying to figure out style because in some ways I didn’t know myself well enough.

As an introvert, I will never be the life of the party, and I’m not an attention-seeker.

I recently discovered that I’m a Highly Sensitive Person (HSP). Now some traits that I was already aware of began to coalesce into a pattern. Interestingly, many of these traits align well with my physical characteristics (colouring and build):

  • I’m very tuned into subtlety > soft summer colours are considered subtle and elegant; I prefer solids, but subtle stripes could work
  • sharp contrast is too “loud” > I prefer monochromatic or analogous colour schemes; I’ll take a low-contrast stripe – no black and white
  • I have a good eye for proportion
  • I like clean lines rather than fussiness > accords with advice I’ve heard for petites; I prefer to keep accessories to a minimum
  • I’m sensitive to texture > I prefer natural fibres, smooth textures (not chunky, some sheen is OK but not shine)
  • I’m graceful and quiet when I move (I keep accidentally sneaking up on people!) > this might be considered elegant
  • I like harmony, not drama > my style will be understated, not dramatic
  • my clothes have to be comfortable
  • I can easily see or feel when clothes don’t fit well (though how to fix it is a separate issue!)

Feeling out of step with the rest of the world is also pretty common among HSPs. Story of my life! Maybe this is why I can’t relate to any of the predefined styles out there. I’m petite and have a pixie cut, but I strongly dislike most things considered “feminine” (including most pinks, pastels, frills, lace and crochet, flounces, most florals, bows, blouses, blouses with bows [shudder], anything that can be described as sweet or cute). I definitely have edge and opinions; I don’t relate to much in the dramatic style but I do like garments with some structure (if I can get them to fit). I like an ethnic/worldly flavour, which suggests bohemian, but I don’t care for the fussy prints, crochet and fringe that tend to go with it – odd and authentic silver toned jewelry is better. I’m too unconventional to be “classic”, but perhaps my unconventionality is subtle. I tend to go for a uniform.

I recently did a little some image searches re basic styles. Most resources seem to focus on a handful of styles, but there isn’t a lot of consistency in which styles. International resources offer different viewpoints and different terms.

At this point, I’m investigating “Parisian chic” as a base style. Some of the premises resonate with me: invest in a capsule of good quality basics in neutral colours and natural materials; basics include a motorcycle jacket (aka moto, aka Perfecto) and well-fitting T-shirts; it’s not an overtly sexy look and always has a bit of edge; err on the side of under-dressed (although with strong basics you’ll never look schlumpy); use accessories to change up your look.

(I’ve never been huge on accessories, but I’ve got a little collection of scarves now (started as dance costume and now expanded to “real clothes”), and since I’ve organised them I’ve been playing around with them more often. They’re also make for an interesting experiment in this not particularly stylish corner of the world. No one looks twice at my muted gunmetal and purple leopard-spot pashmina, or the slightly-less-muted beige, deep pink and berry ikat cotton scarf. But a narrow, predominantly red and pink, boho-ish printed silk scarf flutters in the wind and I get Looks.)

Some Parisian basics don’t grab me quite as much: white shirt (shirt yes but white not so much, though maybe I haven’t found my best tint yet); basics in black or navy (again, perhaps a mere colouring issue – instead of black I’ll try charcoal, and instead of a deep navy maybe a medium one); trench coat (but if it fit well and wasn’t beige…).

More thought and exploration is required…

Does style spill over into other areas of your life? What sorts of style struggles do people have – especially if you sew your own clothes and theoretically have absolute control?

silver

IMGP0670So far so good with these fabrics. The one on top I’d describe as a fine sweater knit – black and grey, with silver threads that turn into glitter and get everywhere when cut. I scored 4m for $10, 100% unknown fibre. The one on the bottom is a very plain poly knit, to be used as lining. I’d bought it a while ago with a different project in mind; I’m glad that it’s not quite as icky as I remembered it. I usually avoid synthetics like the plague, but this is for costume and I’d be surprised if I spend more than 10 hours wearing it over the course of a year.

I’m working on getting the main piece (and, with some luck, a secondary piece) done by June 22, when I have a solo at our student show.

IMGP0671
Berroco Captiva yarn (label says the colour is 5507, but it may have recently been renumbered 7507 – Polished Iron), sequinned fabric in a stormy grey, liquid metal fabric in straight up silver.

I have some ideas for some coordinating costume pieces that I’d like to make out of this stuff, but they may or may not happen. My solo is in a style other than my usual, and our studio has no other performers and no classes in this style. If I don’t get my ideas made before this show coming up, there’s not much reason to make them afterward – unless I go out of my way to look for more opportunities to solo. The costume for my usual style is very colourful, so it could be hard to integrate any of these ideas into regular rotation. Still, I’d like to see them take form.

oh god, more squares

polar bear quilting cotton

I got a bee in my bonnet about making furoshiki out of seasonal prints so I could match the print to the contents of the bundle. I started looking for appropriate prints and had difficulty finding anything that I particularly liked. I eventually ran across a polar bear print at the quilt shop that is walking distance from my house. (So much better than running the gauntlet out to big-box/excessive-traffic land.) I’m now putting away my winter gear, so it all came together nicely.

You know that saying “idle hands are the devil’s tools”? Well, another tool in that box is the rolled hem foot. I’m doing well if I can maintain the same number of curses per hour as regular sewing – it’s usually at least double.

sometimes the rolled hem foot works nicely...
sometimes the rolled hem foot works nicely…

It’s tricky to keep the proper amount (width) of fabric feeding through. Too much, and there’s no room in the hem for the raw edge, which peeks out the side. Too little, and all you get is a single fold with the raw edge sticking out, or it looks good and the raw edge is folded under but it didn’t get caught in the stitching.

... and sometimes, not so much
… and sometimes, not so much (but the really egregious bits, I redo)

My neighbourhood’s annual arts festival took place last week, culminating with the street fair – arts and crafts shopping – on Saturday. For about 10 seconds, I thought about having a booth and making furoshiki to sell, but that way madness lies. For one thing, I get so bored with hemming squares that it’s hard to do more than one in a row.

so instead of vending, I went dancing

hello stranger!

looking south at about 4pm, the sun is already below the rooftops

Hello and Happy New Year! It’s been fairly quiet around here for a while now.

Blogging about my sewing (or not blogging about my sewing, or not blogging because I’m not sewing, as the case may be) has made me sufficiently mindful that I now at least have some insight as to why I’m not sewing (and/or blogging).

It turns out that the number 1 issue that I’m dealing with is a subtle fatigue. This seems to be a health thing but I don’t have any conclusive info. The wheels of inquiry have been set in motion at least: blood tests reveal nothing of interest; sample meds for one possible issue have had little or no effect; and I’ll be having a test for sleep apnea, probably in May.

So how is this relevant to sewing? As a P (as in INTP), I tend towards being indecisive at the best of times, and fatigue takes that to a whole new level. I find that there is generally no point trying to do any kind of problem-solving in the evening. Therefore, fitting (for example) can only be accomplished during daylight hours, which limits me to weekends and holidays. Further, I tend to be unproductive in the evening because I’m already wiped out.

Another, blog-specific, difficulty is getting decent photos. Indoor photos are a challenge: in this rather dark house, that activity too is limited to prime daylight hours. Outdoor photos are impossible: I might try it around 0°C, but at -20°C it’s a firm No. (At this moment, it’s -32°C, and feels like -50 with windchill.) For one thing, you wouldn’t be able to see my makes under my parka.

But I have success to report! I have managed to fit a T-shirt pattern to the dizzying standard of Good Enough! At the moment, all I have to show for it is a pile of mock-ups, but production versions are forthcoming.

So here’s a random photo of my cat instead:

IMGP0367